External Storage
External Storage Feature Guide
Module Path: Super Admin Panel → Settings → External Storage (
/system-settings/external-storage)
Required Permission:system-setting-manage
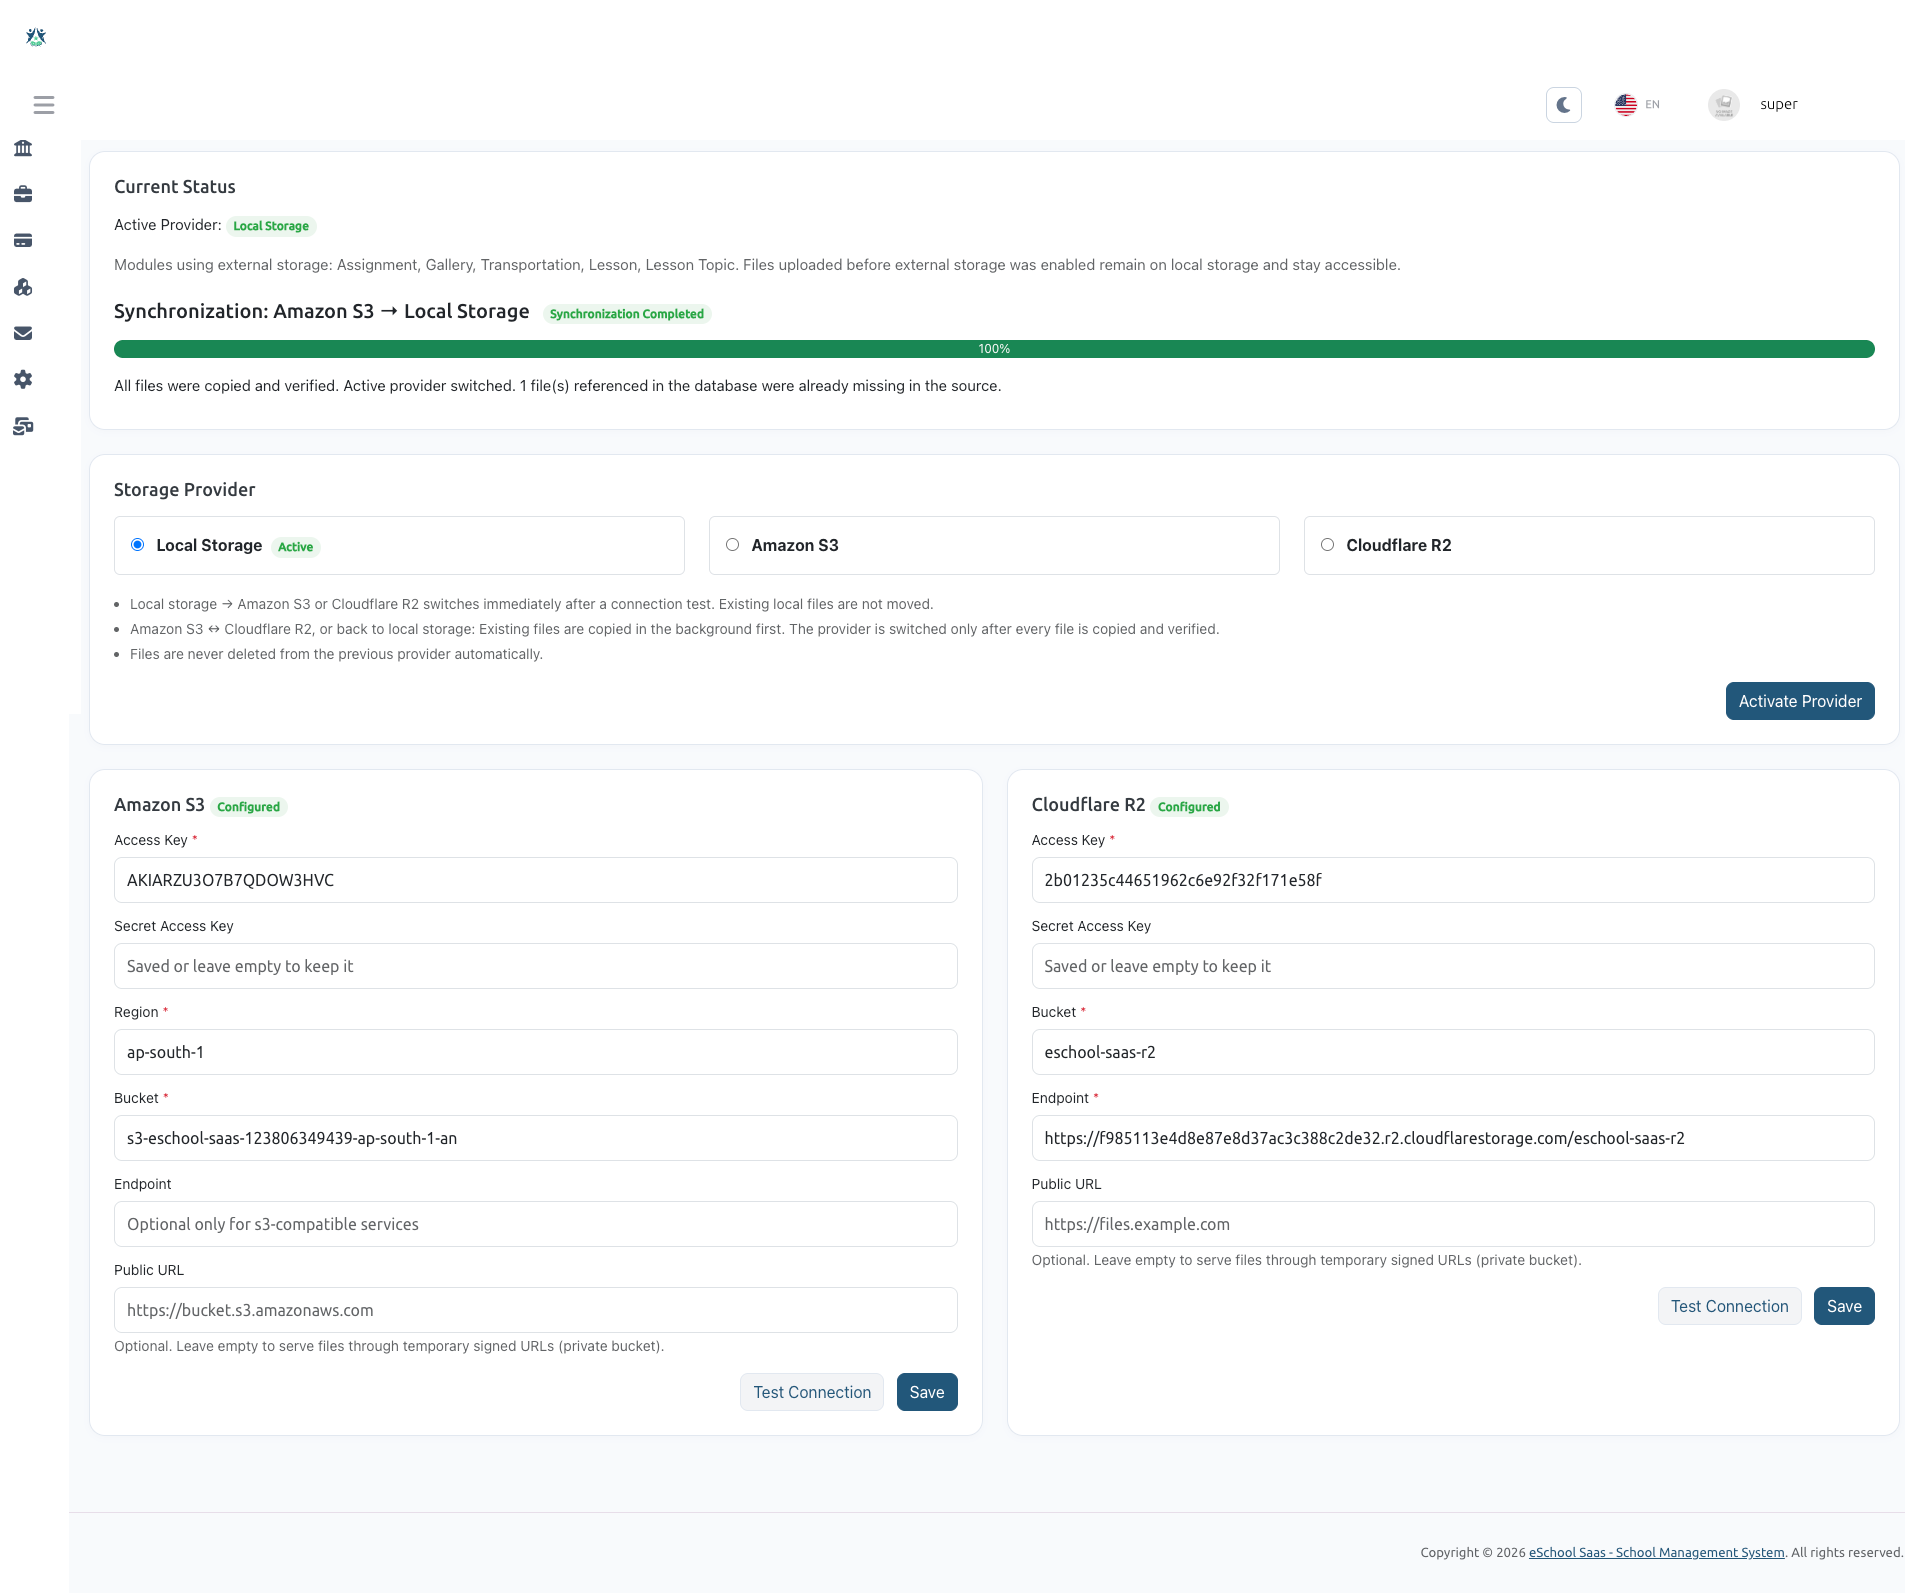
Table of Contents
- Overview & Architecture
- Which Files Are Stored in External Storage?
- Step-by-Step: Obtaining Storage Credentials
- Configuring External Storage in eSchool Admin Panel
- Activating & Switching Storage Providers
- Server Requirements & Queue Worker Setup
- Security & Optimization Details
- Troubleshooting & Frequently Asked Questions (FAQ)
1. Overview & Architecture
Starting with v1.12.0, eSchool SaaS includes a built-in External Storage Engine. This system allows the Super Administrator to store heavy educational media files (assignment attachments, homework submissions, gallery albums, lesson notes, and transport expense receipts) in cloud object storage (Amazon S3 or Cloudflare R2), instead of consuming web server disk space and bandwidth.
+-----------------------------------------------------------------------------------+
|                                  eSchool SaaS                                     |
|               (Controllers / Repositories / UploadService / Models)               |
+-----------------------------------------+-----------------------------------------+
                                          |
                                          v
                         +---------------------------------+
                         |      ExternalStorageService     |
                         |  (Resolves location & active)   |
                         +----------------+----------------+
                                          |
         +--------------------------------+--------------------------------+
         |                                |                                |
         v                                v                                v
+------------------+            +------------------+            +------------------+
|  Local Storage   |            |    Amazon S3     |            |  Cloudflare R2   |
| (Default disk)   |            | (AWS S3 Bucket)  |            | (S3-Compatible)  |
+------------------+            +------------------+            +------------------+
Key Highlights
- Global SaaS Configuration: The storage provider is chosen by the Super Admin at the system level. All schools under the SaaS instance use the configured external storage automatically.
- Strict School Isolation: Each school's uploads are partitioned into its own directory under
{school_id}/.... Super Admin assets are stored undersuper-admin/.... - Zero Broken Links: Database records always store relative paths (e.g.,
12/assignments/filename.pdf). When switching providers, database rows are never altered. - Smart Dual-Location Resolution: When reading files, the system checks whether the file exists locally (e.g. uploaded prior to enabling cloud storage). If found locally, it is served locally; otherwise, it is served from the active cloud provider.
- Fail-Safe Migrations: When migrating between cloud providers (e.g., S3 to R2 or back to Local), an automated background worker copies and verifies every single file before activating the new provider. The old provider is never prematurely switched or erased.
2. Which Files Are Stored in External Storage?
External Storage targets modules with high disk consumption and frequent student/teacher uploads.
Supported Modules & File Categories
The table below describes every module enabled for external storage in config/external-storage.php:
| Module Key | Friendly Name | Model Types | Target Folder in Bucket | What Files Are Stored? |
|---|---|---|---|---|
assignment | Assignments & Submissions | App\Models\AssignmentApp\Models\AssignmentSubmission | {school_id}/assignments/ | - Teacher assignment attachments (PDFs, docs, instructions, images) - Student assignment submission files (homework documents, scanned copies, images) |
gallery | Gallery & Media | App\Models\Gallery | {school_id}/gallery/ | - Gallery album cover / thumbnail images (galleries.thumbnail)- Gallery album photo uploads ( files.file_url)- Auto-generated photo thumbnails ( files.file_thumbnail) |
transportation | Transportation & Vehicles | App\Models\Vehicle | {school_id}/transportation/ | - Vehicle documents & vehicle photos (in files table)- Vehicle expense receipts and bill uploads ( expenses.file where vehicle_id is assigned) |
lesson | Lessons | App\Models\Lesson | {school_id}/lessons/ | - Lesson study materials, uploaded PDF documents, notes, and curriculum files |
lesson_topic | Lesson Topics | App\Models\LessonTopic | {school_id}/lesson-topics/ | - Topic-specific documents, PDFs, study sheets, and uploaded video files |
If a teacher or admin embeds a YouTube video link or an External Web Link, the database stores the external URL string directly. It is not saved as a physical file in the bucket.
What Remains on Local Storage?
To ensure maximum performance and minimal latency for administrative branding, the following files remain on the local server disk (storage/app/public/):
- School logos, favicons, and branding assets
- User avatars, student profile photos, staff photos
- Identity cards (ID cards) and certificates templates
- General settings and system-level configuration media
Multi-Tenant Folder Hierarchy
In the external bucket (AWS S3 or Cloudflare R2), files are organized with clear multi-tenant boundaries:
your-storage-bucket/
├── 1/                          <-- School ID 1
│   ├── assignments/
│   │   ├── assignment_doc_2026_01.pdf
│   │   └── submission_student_45.png
│   ├── gallery/
│   │   ├── album_cover_annual_day.jpg
│   │   └── event_pic_101.jpg
│   ├── transportation/
│   │   └── fuel_receipt_bus03.pdf
│   ├── lessons/
│   │   └── chapter1_physics.pdf
│   └── lesson-topics/
│       └── topic_summary.pdf
├── 2/                          <-- School ID 2
│   ├── assignments/
│   └── lessons/
└── super-admin/                <-- Super Admin files (if any)
How Legacy/Existing Files Are Handled
If you have been running eSchool SaaS on Local Storage and decide to activate Amazon S3 or Cloudflare R2:
- Existing files stay right where they are: Files uploaded prior to activating external storage remain intact on the local disk (
public/storage/...). - Instant Accessibility: The application automatically serves older files from local storage and new uploads from external storage.
- No Downtime: You do not need to pause school activities or run lengthy bulk uploads when switching from Local to S3 or R2.
3. Step-by-Step: Obtaining Storage Credentials
Follow the instructions below to obtain credentials for your preferred cloud provider.
Option A: Amazon Web Services (AWS) S3
Step 1: Log in to AWS Management Console
- Open https://aws.amazon.com/console/ and sign in with your AWS root account or administrative user.
Step 2: Create an S3 Bucket
- In the top search bar, type S3 and select S3.
- Click Create bucket.
- Fill in the bucket details:
- Bucket name: Enter a globally unique lowercase name (e.g.,
eschool-saas-storage-2026). Rules: only lowercase letters, numbers, and hyphens (-). No spaces or underscores. - AWS Region: Choose a region geographically closest to your schools (e.g.,
ap-south-1for Mumbai,us-east-1for N. Virginia,eu-central-1for Frankfurt). Make note of this region code. - Object Ownership: Keep ACLs disabled (recommended).
- Block Public Access settings for this bucket:
- Recommended (Secure): Keep "Block all public access" CHECKED. eSchool will serve files via secure, pre-signed temporary URLs.
- Alternative (Public Bucket): If you prefer public direct URLs or CloudFront CDN, uncheck this box and acknowledge the warning.
- Bucket Versioning / Encryption: Keep defaults (Server-side encryption with Amazon S3 managed keys
SSE-S3).
- Bucket name: Enter a globally unique lowercase name (e.g.,
- Click Create bucket at the bottom.
Step 3: Create an IAM Security Policy
- In the top AWS search bar, type IAM and select IAM.
- In the left navigation menu, click Policies, then click Create policy.
- Select the JSON tab and paste the following policy (replace
YOUR-BUCKET-NAMEwith your actual bucket name):
{
    "Version": "2012-10-17",
    "Statement": [
        {
            "Sid": "eSchoolBucketListing",
            "Effect": "Allow",
            "Action": [
                "s3:ListBucket"
            ],
            "Resource": [
                "arn:aws:s3:::YOUR-BUCKET-NAME"
            ]
        },
        {
            "Sid": "eSchoolObjectAccess",
            "Effect": "Allow",
            "Action": [
                "s3:PutObject",
                "s3:GetObject",
                "s3:DeleteObject"
            ],
            "Resource": [
                "arn:aws:s3:::YOUR-BUCKET-NAME/*"
            ]
        }
    ]
}
s3:ListBucket required?Without s3:ListBucket, AWS responds with HTTP 403 Forbidden for non-existent files rather than 404 Not Found. This causes connection tests and background synchronization to fail.
- Click Next, name the policy
eSchoolS3StoragePolicy, and click Create policy.
Step 4: Create an IAM User & Generate Access Keys
- In the IAM left navigation menu, click Users → Create user.
- User name: e.g.,
eschool-s3-uploader. Click Next. - Under Permissions options, select Attach policies directly.
- Search for
eSchoolS3StoragePolicy, check the box next to it, and click Next. - Click Create user.
- Click on the newly created user in the Users list.
- Go to the Security credentials tab.
- Scroll down to Access keys and click Create access key.
- Select Application running outside AWS, check the confirmation box, and click Next.
- Click Create access key.
- IMPORTANT: Copy your Access Key ID (e.g.,
AKIA...) and your Secret Access Key. Store them safely.
Summary of AWS Fields Needed:
| Field | Example Value | Description |
|---|---|---|
| Access Key | AKIAIOSFODNN7EXAMPLE | Generated IAM Access Key ID |
| Secret Access Key | wJalrXUtnFEMI/K7MDENG/bPxRfiCYEXAMPLEKEY | Generated IAM Secret Access Key |
| Region | ap-south-1 | AWS region code where the bucket is located |
| Bucket | eschool-saas-storage-2026 | S3 bucket name |
| Endpoint | (Leave blank) | Only required for custom S3-compatible endpoints (MinIO/DigitalOcean) |
| Public URL | (Optional) | E.g. https://files.yourdomain.com or CloudFront URL. Leave blank for temporary signed URLs |
Option B: Cloudflare R2 (Zero Egress Fees)
Cloudflare R2 provides S3-compatible storage with zero egress fees, making it highly cost-effective for large student bodies downloading school materials.
Step 1: Log in to Cloudflare Dashboard
- Go to https://dash.cloudflare.com/ and sign in.
Step 2: Open R2 Object Storage
- In the left navigation menu, click R2 or R2 Object Storage.
- If this is your first time using R2, activate R2 on your account.
Step 3: Create an R2 Bucket
- On the R2 Overview page, click Create bucket.
- Bucket Name: Enter a lowercase name (e.g.,
eschool-saas-r2). - Location: Choose Automatic or select a region hint.
- Click Create Bucket.
Step 4: Locate Your Account ID & Endpoint
- Go back to the main R2 Overview page.
- In the right-hand sidebar, find Account ID and click to copy it (e.g.,
a1b2c3d4e5f678901234567890abcdef). - Your R2 Endpoint follows this exact formula:
Example:
https://<ACCOUNT_ID>.r2.cloudflarestorage.comhttps://a1b2c3d4e5f678901234567890abcdef.r2.cloudflarestorage.com
The Cloudflare dashboard often shows the S3 API URL formatted as https://<ACCOUNT_ID>.r2.cloudflarestorage.com/<bucket-name>.
DO NOT include the bucket name in the eSchool endpoint field!
Enter only the host: https://<ACCOUNT_ID>.r2.cloudflarestorage.com. The eSchool system will validate and reject any endpoint containing a path.
Step 5: Create R2 API Tokens (Credentials)
- On the R2 Overview page, click Manage R2 API Tokens (in the right-hand panel).
- Click Create API token.
- Configure the token:
- Token Name: e.g.,
eSchool-R2-Token. - Permissions: Select Object Read & Write.
- Specify bucket(s): Choose Apply to specific bucket only and select the bucket you created in Step 3 (or select All buckets).
- TTL: Keep default (Forever) unless you have a strict token rotation policy.
- Token Name: e.g.,
- Click Create API Token.
- Cloudflare will display your credentials:
- Access Key ID: A 32-character hexadecimal string.
- Secret Access Key: A 64-character hexadecimal string.
- Copy both values immediately (they will not be shown again).
Step 6: Public Access / Custom Domain (Optional)
By default, R2 buckets are private. eSchool generates secure, pre-signed temporary URLs. If you prefer public asset URLs:
- In your R2 bucket page, click the Settings tab.
- Scroll to Public Access.
- Click Connect Domain to bind your custom subdomain (e.g.,
files.schoolsaas.com) or enable ther2.devpublic subdomain. - If configured, enter that URL in the Public URL field in eSchool settings.
Summary of Cloudflare R2 Fields Needed:
| Field | Example Value | Description |
|---|---|---|
| Access Key | 9a8b7c6d5e4f3a2b1c0d9e8f7a6b5c4d | R2 API Token Access Key ID |
| Secret Access Key | 1234567890abcdef... | R2 API Token Secret Access Key |
| Bucket | eschool-saas-r2 | R2 bucket name |
| Endpoint | https://a1b2c3d4e5f67890.r2.cloudflarestorage.com | Host only, no trailing slash, no bucket path |
| Public URL | (Optional) | E.g. https://files.schoolsaas.com. Leave blank for temporary signed URLs |
Option C: Local Storage (Default)
- No credentials or cloud configuration required.
- Files are stored on your server in
/storage/app/public/. - Accessible via the standard web URL:
https://your-domain.com/storage/... - Ensure the symbolic link is created on your server:
php artisan storage:link
4. Configuring External Storage in eSchool Admin Panel
Navigating to the Settings
- Log in to the Super Admin Panel.
- In the left navigation menu, expand Settings and click External Storage.
- The page displays:
- Current Status Card: Shows active provider, supported modules, and synchronization monitor.
- Storage Provider Selector: Radio selection cards for Local Storage, Amazon S3, and Cloudflare R2.
- Credentials Cards: Form boxes for Amazon S3 and Cloudflare R2.
Entering & Testing Credentials
Before saving credentials or switching providers, always test the connection:
- Under the respective provider card (Amazon S3 or Cloudflare R2), enter:
- Access Key
- Secret Access Key
- Region (S3 only, e.g.,
ap-south-1) - Bucket (e.g.,
eschool-saas-bucket) - Endpoint (R2 mandatory; S3 optional)
- Public URL (Optional)
- Click the Test Connection button at the bottom of the card.
- The system performs real-time verification:
- Writes a temporary test object (
.external-storage-test/...). - Reads the object back to verify integrity.
- Verifies bucket listing permissions (
s3:ListBucket). - Deletes the temporary test object and cleans up.
- Writes a temporary test object (
- If successful, a green toast notification will appear:
"Connection successful. Write, read and delete permissions verified."
- If it fails, an error message explaining the root cause (e.g. invalid signature, missing region, access denied) will be displayed.
Saving Configurations
- After a successful connection test, click Save.
- What happens under the hood:
- Credentials are encrypted and written directly to your server's
.envfile (AWS_*orR2_*). - The application clears the configuration cache (
php artisan config:clear). - The queue worker is signaled to restart (
php artisan queue:restart) so background jobs immediately pick up the new credentials. - The stored Secret Access Key is masked for security (
has_secretmode); you can leave the secret key blank during future edits to retain the existing password.
- Credentials are encrypted and written directly to your server's
5. Activating & Switching Storage Providers
Switching from Local Storage to S3 / R2
- Navigate to Storage Provider card at the top of the page.
- Select Amazon S3 or Cloudflare R2 (the option will only be selectable if credentials have been configured).
- Click Activate Provider.
- Confirm the prompt dialog.
- Result:
- A fast automated connection test runs.
- The active provider switches immediately.
- All newly uploaded files go to the cloud bucket under
{school_id}/.... - Older files uploaded to Local Storage remain accessible on the local disk.
Switching Between Cloud Providers or Back to Local
Switching from Amazon S3 → Cloudflare R2, Cloudflare R2 → Amazon S3, or Cloud → Local Storage requires transferring files so no documents or images are lost.
- Ensure your background queue worker is running (see Section 6).
- Select the target provider and click Activate Provider.
- Confirm the modal dialog.
- Instead of switching instantly, the system starts a Background Synchronization process.
- The active provider DOES NOT switch until 100% of files have been copied and verified. Your schools experience zero interruption during the copy process.
Background Synchronization Lifecycle
During synchronization, a live progress monitor appears on the External Storage page:
[ Synchronization: Amazon S3 -> Cloudflare R2 ]   [ In Progress ]
===========================[ 65% ]---------------------------
Total Files: 1,420 | Processed: 923 | Successful: 918 | Skipped: 5 | Failed: 0
How Synchronization Works:
- Enumeration: An asynchronous worker queries every school database (including active and soft-deleted schools). It gathers all file references belonging to supported modules.
- Streamed Copying: Files are streamed directly from the source bucket to the destination bucket using chunked streams. Server RAM is never overloaded, even with large video or archive files.
- Integrity Verification: The worker verifies that the file exists at the destination and matches the exact byte size of the source.
- Smart Skip: If a file was already copied in a prior attempt or still exists on local disk, it is skipped.
- Zero Data Loss on Concurrent Uploads: If a teacher or student uploads a new file while synchronization is in progress, the system automatically registers and syncs the new file too.
- Automatic Cutover: Once all files are copied and verified with 0 failures, the system updates
active_providerto the new provider.
Cancelling and Retrying Synchronization
- Cancel Synchronization:
Click Cancel Synchronization at any time. The process halts gracefully. The active provider remains unchanged on the original provider. - Retry Synchronization:
If any file fails due to temporary network timeouts or provider throttling, the status will show Failed. Click Retry Synchronization. The system skips already copied files and resumes from the failed files.
The system never deletes files from the previous provider automatically. Your old bucket remains untouched as a backup until you manually clean it up.
6. Server Requirements & Queue Worker Setup
Queue Connection Configuration
To perform provider-to-provider synchronization, your Laravel queue connection must not be sync.
Open your server's .env file and verify:
# DO NOT use sync in production
QUEUE_CONNECTION=database
If you just changed to database, create the queue tables if you haven't already:
php artisan queue:table
php artisan queue:failed-table
php artisan migrate
Supervisor Setup for Continuous Queue Workers
On production servers (Ubuntu / Debian / CentOS), use Supervisor to ensure queue workers run continuously and restart automatically on server reboots or failures.
-
Install Supervisor (Ubuntu/Debian):
sudo apt-get update && sudo apt-get install supervisor -y -
Create a configuration file
/etc/supervisor/conf.d/eschool-worker.conf:[program:eschool-worker]
process_name=%(program_name)s_%(process_num)02d
command=php /var/www/html/artisan queue:work --sleep=3 --tries=3 --max-time=3600
autostart=true
autorestart=true
stopasgroup=true
killasgroup=true
user=www-data
numprocs=2
redirect_stderr=true
stdout_logfile=/var/www/html/storage/logs/worker.log
stopwaitsecs=3600(Update
/var/www/htmlto your actual eSchool root directory, andwww-datato your web user). -
Update and start Supervisor:
sudo supervisorctl reread
sudo supervisorctl update
sudo supervisorctl start eschool-worker:*
7. Security & Optimization Details
Pre-Signed Temporary URLs vs Public URLs
By default, cloud buckets can remain completely Private.
- How Pre-Signed URLs Work: When a student or teacher views an assignment or photo, eSchool generates a cryptographically signed URL valid for 60 minutes (configurable via
EXTERNAL_STORAGE_SIGNED_URL_TTLin.env). Once expired, the URL cannot be accessed or hotlinked by unauthorized users. - Public URL Option: If you enter an
AWS_URLorR2_URL(such as a CloudFront or Cloudflare CDN custom domain), direct public URLs are generated instead, reducing AWS pre-signing CPU overhead.
Automatic Image Compression
To conserve cloud storage and ensure rapid loading times in mobile apps and web browsers:
- Uploads in
.jpg,.jpeg, and.pngformats are automatically compressed (quality rating 60) via Intervention Image before saving to the cloud. - Image re-encoding strips embedded malicious metadata, adding an extra layer of file upload security.
School Deletion & Bucket Cleanup
When a school tenant is permanently deleted from the Super Admin panel:
- A background job (
DeleteSchoolExternalFilesJob) automatically purges the school's isolated directory{school_id}/across all configured external storage providers. - This prevents orphaned files from accumulating in your cloud buckets.
8. Troubleshooting & Frequently Asked Questions (FAQ)
Q1: The system says: "The endpoint must not contain the bucket name or any path."
Cause: You entered an endpoint like https://<account_id>.r2.cloudflarestorage.com/my-bucket.
Fix: Remove /my-bucket. The endpoint must be host-only: https://<account_id>.r2.cloudflarestorage.com.
Q2: Connection test fails with: "Missing files are reported as existing. Allow these credentials to list the bucket (s3:ListBucket)"
Cause: Your IAM policy or Cloudflare API token lacks permission to list bucket contents. Without this permission, AWS S3 returns 403 Forbidden on non-existent files, which prevents the system from verifying missing files.
Fix: Add s3:ListBucket permission to your IAM policy (see Option A, Step 3).
Q3: When activating a provider, it says: "A queue worker is required to synchronize files."
Cause: Your .env has QUEUE_CONNECTION=sync. Switching between S3 and R2 requires background queue processing.
Fix: Set QUEUE_CONNECTION=database in .env, run php artisan migrate, and start the worker (php artisan queue:work).
Q4: Can I change the bucket name of a provider that is currently active?
Answer: No. The system prevents changing the bucket or endpoint of a provider currently in use to avoid orphaning existing files.
To change a bucket:
- Configure credentials for an alternate provider (e.g. switch from S3 to R2 or Local).
- Complete the synchronization to the other provider.
- Update the credentials/bucket of the first provider.
- Synchronize back.
Q5: Where can I check logs for external storage operations?
- External storage logs are written to:
storage/logs/external-storage-*.logandstorage/logs/laravel.log. - All credentials, access keys, and authorization signatures are automatically redacted in logs for security.
Q6: What happens if the internet connection or queue worker drops during synchronization?
Answer: The active provider is not switched. Simply click Retry Synchronization. The system tracks which files were already copied and skips them, resuming only the remaining and failed items.